
4.4. Pangolin Flashback 4 internal - ArtNET control
How to control the Laser via ArtNET
ArtNET control makes sense for any type of beam-show or aerial effects. It is especially a mighty and powerful control option if more than 5-6 lasers are in use, as effects generators of the ArtNET controller / ArtNET software then can be used to create astonishing effects.
Custom content can be stored to the mainboard's internal SD card and can then be triggered via ArtNET. The frames and animations are comparable to "Gobos", like in conventional lighting, but these "Gobos" in lasers can not only be static, but be animated, colorful and easily customizable. The Laser system comes with a Pangolin Quickshow software license that allows for creation of custom content, which then can be loaded to the Laser's memory.
Custom content can be stored to the mainboard's internal SD card and can then be triggered via ArtNET. The frames and animations are comparable to "Gobos", like in conventional lighting, but these "Gobos" in lasers can not only be static, but be animated, colorful and easily customizable. The Laser system comes with a Pangolin Quickshow software license that allows for creation of custom content, which then can be loaded to the Laser's memory.
1. Connection schematics - how to wire the cable
ArtNET control allows for triggering the internal intelligence inside the Laser mainboard. There is always one signal "sender" in one DMX "universe" and several signal "recipients".
This is the schematics for the standard ArtNET control wiring for the Laser: 
1. Use standard network cable to wire the ArtNET console / ArtNET-interface with the laser.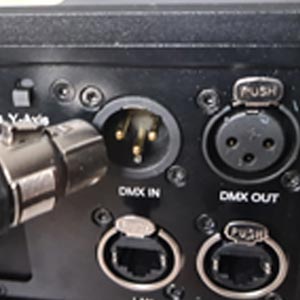
2. Plug the network cable into the laser.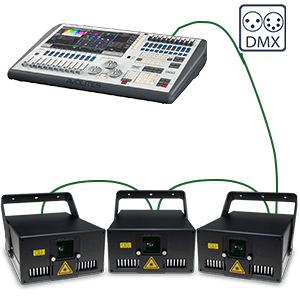
3. Connect the ArtNET console / ArtNET control interface with the laser.
This is the schematics for the standard ArtNET control wiring for the Laser:
1. Use standard network cable to wire the ArtNET console / ArtNET-interface with the laser.
2. Plug the network cable into the laser.
3. Connect the ArtNET console / ArtNET control interface with the laser.
2. Set the ArtNET addresses for each device
Set the correct ArtNET address per Laser so it can be individually addressed via the ArtNET console / ArtNET control software. If Lasers have the same address, then they will follow the same control commands (not recommended, as individual control is not possible then).
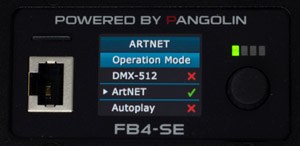
- Configure the ArtNET operation mode:
Turn the selection rotary dial until the cursor points to the menu item "Operation mode" and press it once to expand the menu options: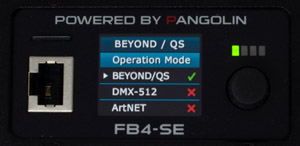
- Turn the rotary dial until the cursor points to the desired operating mode (ArtNET) and press it once. The selected operation mode (ArtNET) is now active:
- Turn the selection rotary dial until the cursor points to the menu item "DMX Settings" and press it once. The following settings become available:
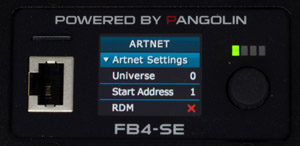
- Start Address: Determines the DMX start address of the FB4 Fixture.
- Termination: Determines if the FB4 will terminate the DMX cable after the DMX signal comes in.
Termination is done at 120Ω
Options:- Auto: The FB4 determines itself if termination is needed
- On: Termination is always enabled
- Off: Termination is always disabled
- Profile: Determines which Fixture profile is active.
- FB3: 16 channel DMX/Artnet fixture profile is active
- FB4: 39 channel DMX/Artnet fixture profile is active
- The FB4 has an adjustable timeout period for DMX. If no DMX frames where received within the specified period, output will stop. This value should be adjusted so that output does not stop too early, when the DMX framerate is low, but still in a timely manner when the DMX source disappears. (the default value is 3.0)
3. Set the DMX profile for each laser - 16 or 39 channels
The FB4 offers two different fixture profile layouts. A 16-channel and a 39-channel layout. DMX settings will be saved when powering down the FB4.
Distributed brands: